How to Build a Small Pallet Shed: Quick and Easy Backyard Project
Hey there, fellow DIY enthusiasts! So, you're dreaming of a little extra storage space in your backyard, but the thought of a full-blown shed construction project feels a bit overwhelming? Don't worry, you're not alone! That's why I'm here to show you how to build a fantastic little pallet shed â€" a project that’s surprisingly simple, relatively inexpensive, and totally achievable even if your carpentry skills are more "enthusiastic beginner" than "master craftsman."Why Choose a Pallet Shed?
Before we dive into the nitty-gritty, let’s talk about why pallet sheds are such a great option. First off, the cost savings are amazing! Repurposing pallets means you're likely spending far less on materials than you would with a traditional shed. Secondly, it’s a wonderfully sustainable project; you're giving old pallets a new life instead of letting them end up in a landfill. And finally, it’s a surprisingly quick project, perfect for a weekend warrior (or a slightly ambitious couple of weekends!).
Gathering Your Supplies: More Than Just Pallets!
Okay, so you might think, "I just need pallets!" And while pallets are the stars of the show, you'll need a few other things to make your shed truly shine. Here's your shopping list:
The Essentials:
- Pallets: The number depends on the size of your shed (more on that later!), but aim for sturdy, undamaged pallets. Check for splinters and loose nails. Look for heat-treated pallets (stamped "HT") â€" these are safer to use than chemically treated ones.
- Hammer and nails/screws: Nails are fine, but screws provide a stronger, more weather-resistant connection.
- Measuring tape and level: Accuracy is key to a structurally sound shed!
- Saw (circular saw or hand saw): You’ll likely need to cut some pallets to size.
- Drill (optional but recommended): Makes driving screws so much easier.
- Safety glasses and work gloves: Always protect your eyes and hands!
- Weed barrier fabric (optional): To protect the ground beneath your shed.
- Roofing material: Consider tarps, corrugated metal sheeting, or even salvaged roofing materials.
Optional Extras:
- Exterior paint or stain: To protect your pallets and add a personal touch.
- Hinges and a latch for the door: Basic shed security.
- Shelving materials: To maximize storage space inside.
Building Your Pallet Shed: A Step-by-Step Guide
Alright, let's get building! Remember, this is a guide, adjust it based on the size and design you envision for your shed.
Step 1: Planning and Design
Before you start hammering, decide on the size and shape of your shed. Sketch it out on paper. A simple rectangular shape is easiest for beginners. Consider the amount of storage space you need and how much space you have available in your backyard.
Step 2: Preparing the Pallets
Inspect your pallets thoroughly. Remove any loose nails or splinters. Cut the pallets to size if needed to fit your design. Remember safety first! Wear your safety glasses and gloves.
Step 3: Building the Base
Lay your first layer of pallets to create the base of your shed. Secure them together using nails or screws. If the ground is uneven, lay down a weed barrier fabric first for a level surface. Then, build up the walls, layering the pallets carefully to ensure stability.
Step 4: Constructing the Walls
Connect the pallets vertically to form the walls of your shed. Use nails or screws to secure the pallets together. Ensure the walls are straight and plumb using your level. You can build your walls to whatever height you desire.
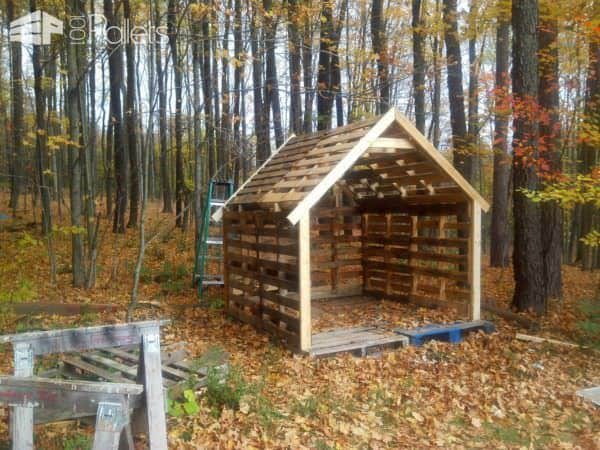
Step 5: Adding a Roof
The roof is a crucial part of protecting your shed's contents. You can create a simple gable roof by using additional pallets cut to the appropriate angles. Alternatively, you can use a flat roof with roofing material (like a tarp). Secure your roofing material properly to keep out rain and snow.
Step 6: Finishing Touches
Once the main structure is up, it's time to add those finishing touches. Install a door using hinges and a latch. Consider adding shelves for extra storage. If desired, paint or stain your shed to protect the wood and personalize its look.
Tips for Success
- Work with a buddy: Having an extra pair of hands makes the job much easier and safer.
- Use the right tools: Investing in a good quality drill and saw will make the project smoother.
- Plan ahead: Measure twice, cut once! Careful planning will save you time and frustration.
- Don't be afraid to ask for help: If you get stuck, don't hesitate to reach out to more experienced DIYers for advice.
- Embrace imperfections: This is a rustic project; don't aim for perfection!
Commonly Asked Questions
Here are some questions I often get asked about building pallet sheds:
- Q: Are all pallets safe to use? A: No, some pallets are treated with chemicals that can be harmful. Look for heat-treated pallets (marked "HT").
- Q: How long does it take to build a pallet shed? A: This depends on the size and complexity of your design. Expect to spend a few weekends, or potentially longer depending on your experience level.
- Q: How much does it cost to build a pallet shed? A: The cost depends largely on whether you source your pallets for free or purchase them. The main additional costs would be for the roofing material, screws/nails, hinges, and any optional extras like paint.
- Q: How long will a pallet shed last? A: With proper construction and weather protection (roofing and possibly a sealant or paint), a pallet shed can last for several years. The wood will naturally age, but with routine maintenance, it can be a durable structure.
- Q: Can I build a pallet shed without any prior experience? A: Absolutely! It's a great project for beginners. Just take your time, follow the steps carefully, and don't be afraid to ask for help when needed.
So there you have it! Building a small pallet shed is a fun, affordable, and rewarding project. With a little planning and effort, you'll have a fantastic new storage solution in your backyard in no time. Happy building!


No comments:
Post a Comment