A pole barn, with its simplicity and adaptability, offers a cost-effective solution for various purposes, from workshops and garages to agricultural storage and livestock shelters. However, the foundation plays a critical role in the longevity and structural integrity of any pole barn. Choosing a solid concrete foundation provides a durable and stable base, ensuring years of reliable service. This comprehensive guide details the steps involved in constructing a pole barn with a robust concrete foundation.
1. Planning and Preparation:
Site Selection: Identify a level or gently sloping area with adequate drainage. Avoid locations with poor soil conditions, such as clay or expansive soils.
Design and Permits: Create detailed plans for the barn, including dimensions, roof pitch, and door and window placement. Obtain necessary building permits from your local authority.
Foundation Design: Consult with a structural engineer to design a foundation that can withstand the anticipated load of the barn. This will involve determining the thickness and reinforcement of the concrete slab, the size and spacing of the foundation piers, and the depth of the footings.
Soil Testing: Conduct a soil test to determine the soil bearing capacity and ensure the foundation can safely support the structure.
Utilities: Plan the placement of electrical, plumbing, and other utilities in advance to avoid disruption during construction.
Materials and Equipment: Gather the necessary materials, including concrete, rebar, gravel, sand, lumber, and post-hole digger. Rent or purchase equipment like a concrete mixer, vibratory plate compactor, and a forklift.
2. Foundation Excavation and Preparation:
Footings: Dig trenches for the footings according to the engineer's specifications. The trenches should be wider and deeper than the footings themselves to allow for proper compaction of the gravel base.
Gravel Base: Fill the trenches with a layer of compacted gravel to provide drainage and improve the load-bearing capacity of the soil.
Forms: Construct forms for the foundation piers using plywood or treated lumber. Ensure the forms are plumb and level.
Rebar: Install rebar cages within the forms according to the engineer's specifications. This provides tensile strength to the concrete.
3. Concrete Pouring and Curing:
Mixing: Mix the concrete according to the manufacturer's instructions. Use a concrete mixer for large quantities.
Pouring: Pour the concrete into the forms, ensuring it fills the space completely and makes good contact with the rebar.
Vibratory Compaction: Use a vibratory plate compactor to remove air bubbles and ensure a dense and stable concrete slab.
Curing: Cover the concrete with plastic sheeting to prevent it from drying too quickly. Allow the concrete to cure for a minimum of 28 days before proceeding with the next steps.
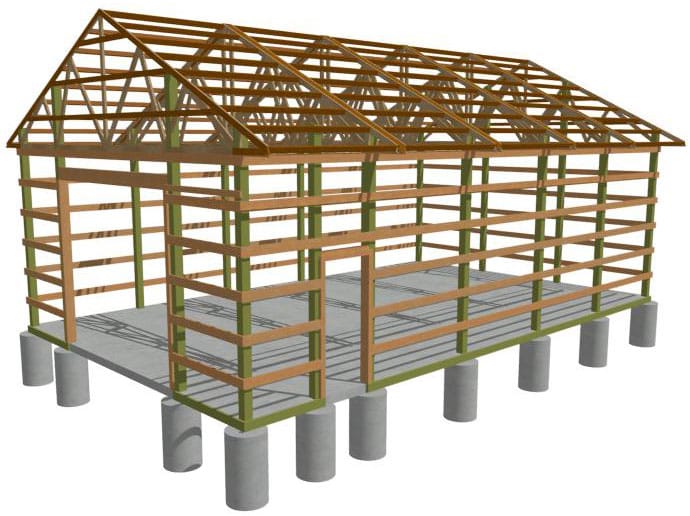
4. Post Installation and Framing:
Post Placement: Once the concrete foundation is fully cured, position the posts at the designated locations. The posts should be plumb and level.
Post Anchoring: Securely anchor the posts to the foundation using post anchors or a concrete-filled collar.
Framing: Construct the wall and roof framing using lumber. Ensure the framing is plumb and level, and that the joints are properly braced for stability.
5. Roof Construction and Finishing Touches:
Roof Trusses: Install roof trusses according to the design specifications. Ensure the trusses are properly supported and securely attached to the wall framing.
Roof Sheathing: Apply roof sheathing over the trusses. Use plywood or OSB (oriented strand board).
Roofing: Install the roofing material, including shingles, metal roofing, or other preferred options.
Siding and Trim: Install the siding and trim, ensuring proper flashing and sealing around windows and doors.
Doors and Windows: Install the doors and windows according to the specifications. Ensure they are securely mounted and operate smoothly.
6. Interior Finishing and Utilities:
Flooring: Install flooring materials such as concrete, epoxy, or wood.
Electrical and Plumbing: Install the electrical wiring, plumbing, and any other utilities according to local codes and regulations.
Insulation: Install insulation in the walls and ceiling to improve energy efficiency and comfort.
Painting: Paint the interior and exterior surfaces according to your preference.
7. Maintenance and Care:
Inspect Regularly: Regularly inspect the structure for any signs of damage or wear.
Seal and Paint: Re-seal and paint the exterior surfaces periodically to protect against weather damage.
Maintain Drainage: Ensure the foundation drainage system remains functional.
Address Problems Promptly: If any problems arise, address them promptly to prevent further damage.
Considerations for a Pole Barn with a Concrete Foundation:
Cost: Concrete foundations are typically more expensive than other options like piers or gravel pads. However, they provide a superior level of durability and stability.
Accessibility: Ensure the foundation is accessible for construction equipment and for future maintenance.
Site Conditions: Consider the soil conditions and the local climate when designing the foundation.
Drainage: Ensure proper drainage around the foundation to prevent water damage.
Local Codes: Consult with your local building department to ensure compliance with all codes and regulations.
Conclusion:
Constructing a pole barn with a solid concrete foundation requires careful planning, meticulous execution, and adherence to best practices. This detailed guide provides a comprehensive overview of the process, from initial planning to final finishing touches. By following these steps, you can ensure your pole barn is built to last, providing years of reliable service and meeting your specific needs. Remember to consult with a structural engineer, obtain necessary permits, and prioritize safety throughout the construction process.


No comments:
Post a Comment