Build a Wood Pallet Shed for Your Backyard with These Easy Instructions

Build a Wood Pallet Shed for Your Backyard with These Easy Instructions

Build Your Dream Backyard Shed from Reclaimed Wood Pallets

Transform discarded wood pallets into a charming and functional backyard shed! This project is perfect for DIY enthusiasts seeking a cost-effective and eco-friendly storage solution. Forget expensive pre-fabricated sheds; with a little elbow grease and these detailed instructions, you'll build a unique and sturdy structure to house your gardening tools, outdoor toys, or anything else that needs a safe and dry place.

Planning Your Pallet Shed Project

Before you dive into construction, careful planning is crucial. Measure your desired shed dimensions, considering the available space in your backyard and the size of the pallets you’ll be using. Standard pallets measure approximately 48 inches by 40 inches, so factor this into your design. Sketch a simple plan, noting the number of pallets needed for the walls, roof, and floor. Source your pallets responsibly; ensure they are treated for outdoor use and free from rot or significant damage. Check local regulations regarding the use of reclaimed wood â€" some areas may require specific treatments or permits.

Gathering Your Materials and Tools

Essential Materials

You'll need a substantial number of reclaimed wood pallets â€" the exact quantity depends on your shed's size. In addition to the pallets, gather the following:

  • Strong screws and a drill with various drill bits: Choose exterior-grade screws designed for wood to ensure longevity.
  • Pressure-treated lumber for the foundation: This will create a level and stable base for your shed.
  • Roofing materials: Choose a material suitable for outdoor conditions â€" tar paper, shingles, or even a heavy-duty tarp will work.
  • Optional: Exterior paint or stain to protect and beautify the shed.

Necessary Tools

Assemble your toolbox with these essential tools:

  • Measuring tape and level: Accuracy is vital for a sturdy structure.
  • Hammer and pry bar: For dismantling and assembling the pallets.
  • Screwdriver bits (or impact driver): To fasten the screws efficiently.
  • Safety glasses and work gloves: Always prioritize safety!
  • Circular saw (or hand saw): To cut pallets to size if needed.

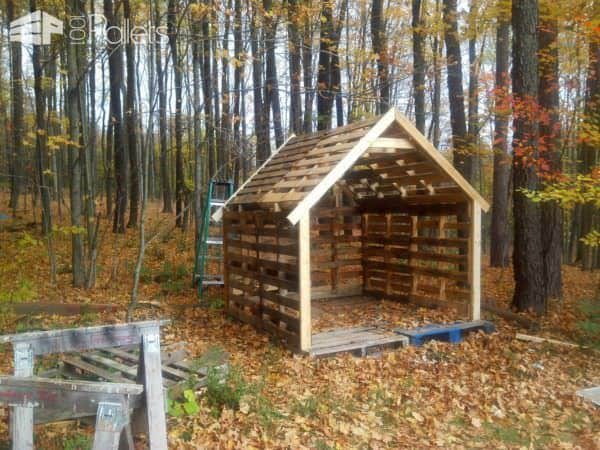
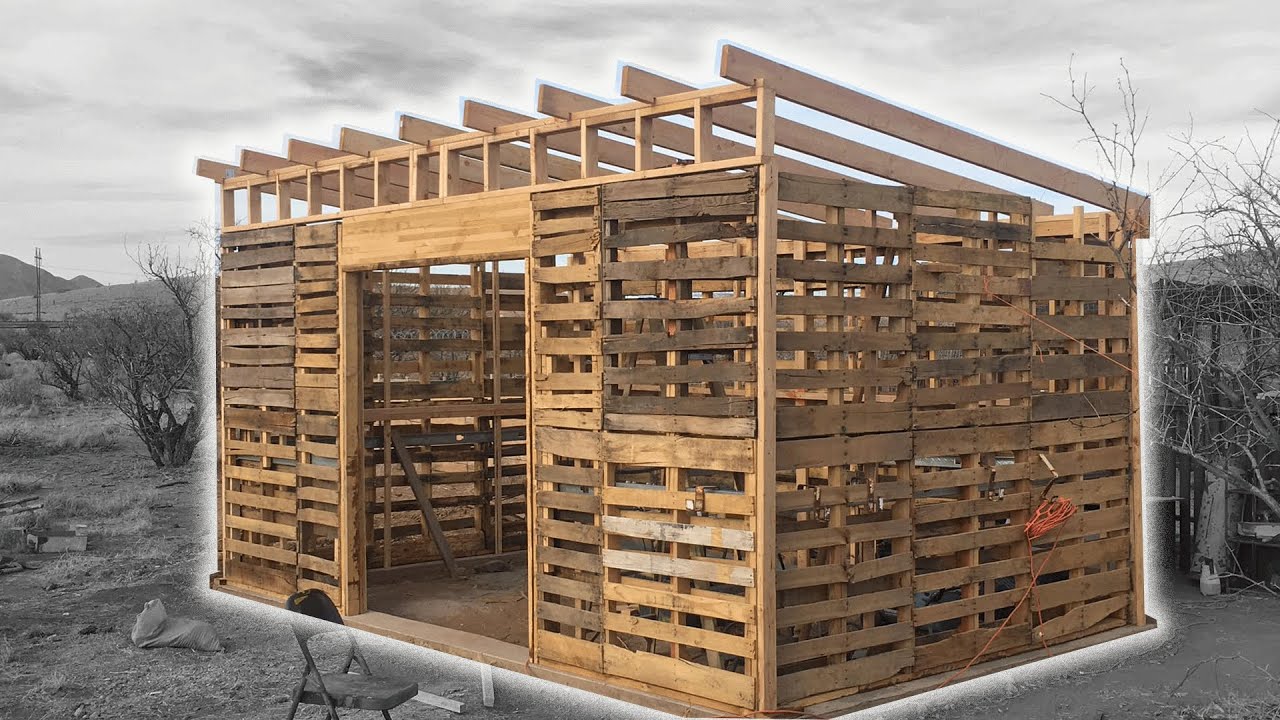
Construction: Building Your Pallet Shed

Begin by preparing the foundation. Level the ground and create a frame using pressure-treated lumber. This will prevent rot and provide a stable base. Next, assemble the walls. You can arrange the pallets vertically or horizontally, depending on your preference and the structural integrity of the pallets. Securely fasten the pallets together using screws. For added strength, consider adding corner posts made from the pressure-treated lumber. Once the walls are complete, construct the roof. You can create a simple gable roof using additional pallets or other suitable lumber. Cover the roof with your chosen roofing material to ensure water resistance. Finally, add a door and any desired windows, cutting openings in the appropriate pallet sections. Securely fasten the door and any additional features.

Finishing Touches and Maintenance

After completing the construction, consider adding a layer of exterior paint or stain to enhance the shed's appearance and protect the wood from the elements. Regular maintenance is key to extending the lifespan of your pallet shed. Inspect the structure periodically for loose screws or damaged pallets, and address any issues promptly. Regular cleaning and occasional repainting will keep your shed looking great for years to come. Enjoy your new, charming, and functional backyard shed â€" a testament to your DIY skills and resourcefulness!

Share:

Lean-To Shed Build: How to Build a Sturdy and Functional Shed

Lean-To Shed Build: How to Build a Sturdy and Functional Shed

Lean-To Shed Build: How to Build a Sturdy and Functional Shed

Dreaming of extra storage space or a cozy workshop tucked away from the elements? A lean-to shed offers a simple yet effective solution, easily integrated into an existing structure like a house or garage. This guide provides a comprehensive walkthrough, empowering you to build a sturdy and functional lean-to shed that will serve you for years to come. We’ll cover everything from planning and material selection to construction techniques, ensuring a successful and satisfying project.

Planning Your Lean-To Shed

Before you even touch a tool, meticulous planning is crucial. First, determine the purpose of your shed. Will it store gardening equipment, hold bicycles, or serve as a workshop? This dictates the required size and features. Next, choose a suitable location. Consider proximity to existing structures, access for materials delivery, and sunlight exposure. Check local building codes and regulations regarding permits and setbacks. Finally, sketch a detailed plan, including dimensions, door placement, and roof design. This plan will serve as your roadmap throughout the construction process.

Essential Measurements and Considerations

Accurate measurements are paramount. Carefully measure the existing structure to which you'll attach the lean-to. Determine the desired width and length of your shed, ensuring it complements the existing building. Consider the roof pitch â€" a steeper pitch sheds snow better but requires more material. Don't forget to factor in the height you need for comfortable access and storage within the shed.

Gathering Materials and Tools

With your plans finalized, create a comprehensive materials list. This will prevent frustrating delays and ensure you have everything you need on hand. For the frame, you’ll likely need pressure-treated lumber (for rot resistance), such as 4x4 posts for the foundation and 2x4s for the walls and roof rafters. For the roof, choose durable roofing material such as asphalt shingles or metal sheeting. You'll also need screws, nails, concrete for the foundation (if needed), plywood for sheathing, and any desired interior finishes. Gather your tools, including a level, measuring tape, saw, drill, hammer, and safety glasses.

Essential Tool Checklist

To avoid interruptions during construction, assemble these crucial tools beforehand:

  • Measuring tape
  • Level
  • Circular saw or hand saw
  • Drill with various drill bits
  • Hammer
  • Shovel (for digging post holes, if applicable)
  • Safety glasses and work gloves

Construction: Step-by-Step Guide

Begin by preparing the foundation. This might involve setting concrete posts in the ground, creating a concrete slab, or simply anchoring the base to the existing structure with strong bolts. Next, erect the frame. Start by attaching the vertical supports to the foundation, ensuring they are plumb and level. Then, construct the walls using 2x4s, attaching them to the vertical supports. Install your chosen roofing material, ensuring proper overlapping and sealing to prevent leaks. Finally, add sheathing to the walls, install a door, and apply any desired interior or exterior finishes.

Securing the Foundation

The foundation is critical for stability. For a simple lean-to against a solid wall, you may be able to directly attach the frame to the wall using heavy-duty anchors and bolts. However, for freestanding lean-tos, constructing a concrete foundation or using pressure-treated posts set in concrete is essential to prevent settling and rot.

Finishing Touches and Maintenance

Once the structure is complete, add the finishing touches. This could include painting or staining the exterior, adding insulation for improved temperature control, and installing shelving or other interior features. Regular maintenance is key to prolonging the life of your shed. Check the structure annually for any signs of damage or deterioration, and address any issues promptly to prevent costly repairs down the line. Regular cleaning will also keep your shed functional and organized.

Building your own lean-to shed is a rewarding experience, providing valuable skills and a practical addition to your property. By following these steps and prioritizing careful planning and execution, you can create a sturdy and functional lean-to that will serve your needs for years to come. Remember safety first throughout the entire process.

Share:

DIY Pallet Shed: How to Make an Efficient and Budget-Friendly Shed

DIY Pallet Shed: How to Make an Efficient and Budget-Friendly Shed

DIY Pallet Shed: How to Make an Efficient and Budget-Friendly Shed

Constructing a shed from reclaimed pallets offers a compelling blend of cost-effectiveness and environmental responsibility. This guide provides a comprehensive approach to building a durable and functional pallet shed, emphasizing efficiency and minimizing expenditure. While seemingly simple, careful planning and execution are crucial for a successful outcome. This detailed guide will walk you through each stage, from initial design to final finishing touches.

Phase 1: Planning and Preparation

Before initiating construction, meticulous planning is essential. This phase lays the groundwork for a smooth and efficient building process, minimizing potential setbacks and maximizing resource utilization.

1.1 Site Selection and Assessment

The location of your shed significantly impacts its functionality and longevity. Consider factors such as:

  • Accessibility: Ensure easy access for delivery of materials and future maintenance.
  • Sunlight and Shade: Balance sufficient sunlight for ventilation and potential drying with adequate shade to prevent excessive heat buildup.
  • Ground Condition: Assess the ground's stability and drainage. A level surface is paramount for a stable structure.
  • Proximity to Utilities: Consider proximity to power sources if electricity is required within the shed.

1.2 Shed Design and Dimensions

Determine the required dimensions of your shed based on intended storage needs. Sketch a detailed plan, including:

  • Overall Dimensions: Length, width, and height.
  • Door Placement and Size: Consider the size and frequency of item movement.
  • Window Placement and Size: Strategically place windows for optimal ventilation and natural light.
  • Internal Shelving: Plan for shelving to maximize storage capacity.

Consider creating a scale model to visualize the design before proceeding with construction.

1.3 Pallet Sourcing and Assessment

Sourcing suitable pallets is crucial. Prioritize pallets constructed from sound, untreated wood. Inspect each pallet for:

  • Rot and Decay: Discard pallets showing significant signs of rot or decay.
  • Pest Infestation: Check for evidence of insect infestation, such as borers or termites.
  • Structural Integrity: Ensure the structural integrity of the pallet's framing. Broken or damaged boards should be replaced.
  • Heat Treatment: Identify heat-treated pallets (indicated by markings) to avoid using chemically treated wood.

Gather a sufficient number of pallets to meet your design requirements. It’s often advisable to have extra pallets on hand to account for potential damage or unforeseen needs.

Phase 2: Construction

The construction phase involves assembling the pallet structure and incorporating necessary features. Proceed systematically and ensure each step is completed accurately before moving to the next.

2.1 Foundation Preparation

A level foundation is critical for structural stability. Consider these options:

  • Concrete Slab: Provides the most stable foundation but requires more effort and expense.
  • Gravel Base: A simpler, budget-friendly option involving compacting a layer of gravel to create a level surface.
  • Wooden Frame: A cost-effective choice involving constructing a wooden frame on top of the ground, ensuring levelness.

Regardless of your chosen foundation, ensure it is level using a spirit level.

2.2 Pallet Assembly

Carefully disassemble the sourced pallets. Remove any nails or staples that are loose or pose a safety hazard. Clean the pallets thoroughly to remove dirt and debris. Begin assembling the shed walls by connecting pallets using screws and wood glue for added strength. Ensure the pallets are tightly aligned and square.

Consider using additional support beams where necessary to reinforce the structure, particularly at corners and load-bearing points. Use weatherproof screws for durability. A well-structured framework is the cornerstone of a lasting shed.

2.3 Roof Construction

The roof structure is equally critical. Construct a gable or shed roof based on your design. Use strong support beams and rafters. Cover the roof with a suitable roofing material such as corrugated metal sheeting or waterproof fabric. Ensure proper waterproofing to protect the internal contents from moisture.

Adequate roof overhang is crucial to prevent rainwater from directly impacting the shed's walls. Properly securing the roofing material will prevent wind damage and maintain the structure's integrity.

2.4 Door and Window Installation

Install the door and windows, ensuring secure framing and fitting. For the door, you can use reclaimed wood or purchase a pre-made door that fits the dimensions. Ensure the door is properly sealed to prevent drafts and leaks. Windows should be appropriately sealed to ensure weatherproofing and efficient ventilation.

Consider using weather stripping around doors and windows to improve insulation and prevent drafts. This will increase the functionality and durability of your structure.

Phase 3: Finishing Touches

The finishing touches enhance both the aesthetics and the longevity of your pallet shed. Attention to detail at this stage significantly improves the shed's overall quality.

3.1 Exterior Finishing

Apply a suitable wood preservative to protect the pallets from the elements. This will extend the lifespan of the shed and maintain its appearance. Consider a weather-resistant paint or stain to enhance the aesthetic appeal and provide additional protection. Multiple coats are recommended for optimal durability.

3.2 Interior Finishing

The interior can be customized based on your requirements. Install shelves, hooks, or other storage solutions. A coat of paint or varnish can enhance the interior's aesthetic appeal and provide a cleaner finish. Ensure proper ventilation to prevent moisture buildup, particularly if storing moisture-sensitive items.

3.3 Safety Considerations

Throughout the construction process, prioritize safety. Use appropriate personal protective equipment (PPE) such as safety glasses and gloves. Ensure the tools used are in good working order and are operated correctly. Dispose of any construction waste responsibly.

Building a DIY pallet shed is a rewarding project that combines resourcefulness, creativity, and practical skills. By following this guide meticulously and prioritizing safety, you can construct a durable, efficient, and budget-friendly shed that perfectly meets your storage needs.

Share:

How to Build a Small Pallet Shed: Quick and Easy Backyard Project

How to Build a Small Pallet Shed: Quick and Easy Backyard Project

How to Build a Small Pallet Shed: Quick and Easy Backyard Project

Hey there, fellow DIY enthusiasts! So, you're dreaming of a little extra storage space in your backyard, but the thought of a full-blown shed construction project feels a bit overwhelming? Don't worry, you're not alone! That's why I'm here to show you how to build a fantastic little pallet shed â€" a project that’s surprisingly simple, relatively inexpensive, and totally achievable even if your carpentry skills are more "enthusiastic beginner" than "master craftsman."

Why Choose a Pallet Shed?

Before we dive into the nitty-gritty, let’s talk about why pallet sheds are such a great option. First off, the cost savings are amazing! Repurposing pallets means you're likely spending far less on materials than you would with a traditional shed. Secondly, it’s a wonderfully sustainable project; you're giving old pallets a new life instead of letting them end up in a landfill. And finally, it’s a surprisingly quick project, perfect for a weekend warrior (or a slightly ambitious couple of weekends!).

Gathering Your Supplies: More Than Just Pallets!

Okay, so you might think, "I just need pallets!" And while pallets are the stars of the show, you'll need a few other things to make your shed truly shine. Here's your shopping list:

The Essentials:

  • Pallets: The number depends on the size of your shed (more on that later!), but aim for sturdy, undamaged pallets. Check for splinters and loose nails. Look for heat-treated pallets (stamped "HT") â€" these are safer to use than chemically treated ones.
  • Hammer and nails/screws: Nails are fine, but screws provide a stronger, more weather-resistant connection.
  • Measuring tape and level: Accuracy is key to a structurally sound shed!
  • Saw (circular saw or hand saw): You’ll likely need to cut some pallets to size.
  • Drill (optional but recommended): Makes driving screws so much easier.
  • Safety glasses and work gloves: Always protect your eyes and hands!
  • Weed barrier fabric (optional): To protect the ground beneath your shed.
  • Roofing material: Consider tarps, corrugated metal sheeting, or even salvaged roofing materials.

Optional Extras:

  • Exterior paint or stain: To protect your pallets and add a personal touch.
  • Hinges and a latch for the door: Basic shed security.
  • Shelving materials: To maximize storage space inside.

Building Your Pallet Shed: A Step-by-Step Guide

Alright, let's get building! Remember, this is a guide, adjust it based on the size and design you envision for your shed.

Step 1: Planning and Design

Before you start hammering, decide on the size and shape of your shed. Sketch it out on paper. A simple rectangular shape is easiest for beginners. Consider the amount of storage space you need and how much space you have available in your backyard.

Step 2: Preparing the Pallets

Inspect your pallets thoroughly. Remove any loose nails or splinters. Cut the pallets to size if needed to fit your design. Remember safety first! Wear your safety glasses and gloves.

Step 3: Building the Base

Lay your first layer of pallets to create the base of your shed. Secure them together using nails or screws. If the ground is uneven, lay down a weed barrier fabric first for a level surface. Then, build up the walls, layering the pallets carefully to ensure stability.

Step 4: Constructing the Walls

Connect the pallets vertically to form the walls of your shed. Use nails or screws to secure the pallets together. Ensure the walls are straight and plumb using your level. You can build your walls to whatever height you desire.

Step 5: Adding a Roof

The roof is a crucial part of protecting your shed's contents. You can create a simple gable roof by using additional pallets cut to the appropriate angles. Alternatively, you can use a flat roof with roofing material (like a tarp). Secure your roofing material properly to keep out rain and snow.

Step 6: Finishing Touches

Once the main structure is up, it's time to add those finishing touches. Install a door using hinges and a latch. Consider adding shelves for extra storage. If desired, paint or stain your shed to protect the wood and personalize its look.

Tips for Success

  • Work with a buddy: Having an extra pair of hands makes the job much easier and safer.
  • Use the right tools: Investing in a good quality drill and saw will make the project smoother.
  • Plan ahead: Measure twice, cut once! Careful planning will save you time and frustration.
  • Don't be afraid to ask for help: If you get stuck, don't hesitate to reach out to more experienced DIYers for advice.
  • Embrace imperfections: This is a rustic project; don't aim for perfection!

Commonly Asked Questions

Here are some questions I often get asked about building pallet sheds:

  • Q: Are all pallets safe to use? A: No, some pallets are treated with chemicals that can be harmful. Look for heat-treated pallets (marked "HT").
  • Q: How long does it take to build a pallet shed? A: This depends on the size and complexity of your design. Expect to spend a few weekends, or potentially longer depending on your experience level.
  • Q: How much does it cost to build a pallet shed? A: The cost depends largely on whether you source your pallets for free or purchase them. The main additional costs would be for the roofing material, screws/nails, hinges, and any optional extras like paint.
  • Q: How long will a pallet shed last? A: With proper construction and weather protection (roofing and possibly a sealant or paint), a pallet shed can last for several years. The wood will naturally age, but with routine maintenance, it can be a durable structure.
  • Q: Can I build a pallet shed without any prior experience? A: Absolutely! It's a great project for beginners. Just take your time, follow the steps carefully, and don't be afraid to ask for help when needed.

So there you have it! Building a small pallet shed is a fun, affordable, and rewarding project. With a little planning and effort, you'll have a fantastic new storage solution in your backyard in no time. Happy building!

Share:

DIY Lean-To Shed: Create a Functional Shed with Simple Instructions

DIY Lean-To Shed: Create a Functional Shed with Simple Instructions

Constructing a Functional Lean-To Shed: A Comprehensive Guide

This guide provides a detailed, step-by-step approach to constructing a lean-to shed, emphasizing practicality and functionality. While prior construction experience is beneficial, this project is designed to be achievable for reasonably handy individuals with basic tools. Safety should always be the paramount concern throughout the construction process. Appropriate safety gear, including eye protection, work gloves, and hearing protection, must be worn at all times.

Phase 1: Planning and Preparation

Thorough planning is crucial for a successful project. This phase involves determining the shed’s dimensions, selecting appropriate materials, and obtaining necessary permits.

1.1 Determining Dimensions and Location

The first step involves determining the desired dimensions of your lean-to shed. Consider the intended use. A small shed might suffice for storing gardening tools, while a larger structure may be necessary for housing bicycles, lawn equipment, or other items. The lean-to's length will be determined by the existing structure to which it will attach (e.g., a house, garage, or fence). The width and depth should be chosen to accommodate your storage needs while maintaining proportionality. Ensure the chosen location is level and allows for adequate access.

1.2 Material Selection

Selecting appropriate materials is crucial for both the shed's longevity and structural integrity. The following are common choices:

  • Framing Lumber: Pressure-treated lumber is recommended for its resistance to rot and insect damage. Common sizes include 4x4s for posts and 2x4s or 2x6s for rafters, studs, and plates.
  • Sheathing: Plywood or OSB (Oriented Strand Board) provides a strong and durable surface for the roof and walls. Consider the thickness based on the shed's size and anticipated snow load.
  • Roofing Material: Asphalt shingles are a cost-effective and widely available option. Other choices include metal roofing, which offers superior durability but higher cost.
  • Siding: Various siding options exist, including vinyl, wood, and metal. Choose a material that complements your existing structures and offers the desired level of maintenance.
  • Fasteners: Galvanized nails and screws provide superior corrosion resistance in outdoor environments.

1.3 Obtaining Necessary Permits

Before commencing construction, check with your local building authority to determine if any permits are required. Permit requirements vary by location and the size and complexity of the structure. Obtaining the necessary permits ensures compliance with local building codes and avoids potential fines or legal issues.

Phase 2: Foundation and Framing

This phase focuses on constructing a stable foundation and erecting the shed's frame.

2.1 Foundation Construction

A simple concrete slab or gravel base is usually sufficient for a lean-to shed. For a concrete slab, excavate a level area, add a gravel base for drainage, and pour a concrete slab of appropriate thickness. For a gravel base, level the ground, lay down landscape fabric to prevent weed growth, and compact several inches of gravel. Ensure the base is level and large enough to support the shed's weight.

2.2 Frame Assembly

The frame construction begins with attaching the base plates to the foundation. Then, erect the vertical posts, ensuring they are plumb and securely fastened. Next, construct the rafter system. The rafters should be spaced appropriately (typically 16" or 24" on center) and have adequate overhang to protect the walls from rain. Securely attach the rafters to the supporting structure and the top plate.

Phase 3: Sheathing and Roofing

This phase involves covering the frame with sheathing and installing the roofing material.

3.1 Wall Sheathing

Once the frame is complete, attach the sheathing to the walls. Ensure the sheathing is properly aligned and securely fastened to the studs. Consider using construction adhesive along with nails or screws for improved strength and weather resistance.

3.2 Roof Sheathing

Install roof sheathing over the rafters, ensuring proper alignment and overlapping of sheets. This creates a solid base for the roofing material. Use appropriate fasteners and ensure all sheathing is securely attached.

3.3 Roofing Installation

Once the roof sheathing is complete, begin installing the roofing material. Follow the manufacturer's instructions carefully. Ensure proper overlapping of shingles or panels to prevent leaks. Pay special attention to the edges and valleys of the roof to ensure a watertight seal. Consider using roofing cement or sealant at critical points.

Phase 4: Siding and Finishing Touches

This final phase adds the finishing touches to complete the shed.

4.1 Siding Installation

Install the chosen siding material, ensuring it is properly aligned and securely fastened. Follow the manufacturer’s installation instructions for specific details. Proper installation helps to protect the structure from the elements and enhances its aesthetic appeal.

4.2 Door and Window Installation (Optional)

If desired, install a door and/or windows, ensuring proper framing and weather sealing. Use appropriate hinges, latches, and weather stripping to ensure a tight and secure fit.

4.3 Final Inspection

Conduct a final inspection to ensure all components are securely fastened and the structure is watertight. Check for any loose nails, gaps in the sheathing or siding, or other potential issues. Address any problems before they become significant.

Conclusion

Constructing a lean-to shed is a rewarding project that can enhance the functionality of your property. By following these instructions and prioritizing safety, you can create a durable and practical storage solution. Remember to always consult local building codes and obtain necessary permits before beginning construction. With careful planning and execution, you can enjoy the benefits of your newly built lean-to shed for years to come.

Share:

12x20 Shed with Loft Plans: Get Started Now

12x20 Shed with Loft Plans: Get Started Now

12x20 Shed with Loft Plans: Get Started Now

The construction of a 12x20 shed with a loft presents a compelling opportunity to maximize storage space and functionality on your property. This comprehensive guide provides a detailed overview of the planning, design, and construction considerations for such a project, empowering you to embark on this endeavor with confidence and precision.

Phase 1: Planning and Design

Before commencing any construction, meticulous planning is paramount. This phase involves several crucial steps that will lay the groundwork for a successful project.

Site Selection and Preparation

The chosen location for your shed significantly impacts its usability and longevity. Consider factors such as:

  • Accessibility: Ensure easy access for construction materials and future use.
  • Sunlight and Shade: Optimize for natural light while considering potential shading from trees or other structures.
  • Drainage: Select a site with adequate drainage to prevent water accumulation around the shed's foundation.
  • Utilities: Proximity to electrical outlets or potential water sources (if applicable) should be evaluated.
  • Local Regulations: Check with your local authorities regarding building permits, setback requirements, and zoning regulations.

Once the site is selected, thorough site preparation is necessary. This involves clearing the area of vegetation, leveling the ground, and compacting the soil to provide a stable base for the foundation.

Shed Design and Dimensions

A 12x20 shed offers considerable flexibility in design. Careful consideration should be given to the internal layout to maximize the utility of both the ground floor and the loft area. Key design elements include:

  • Door Placement and Size: Strategically locate doors to optimize access and minimize obstructions.
  • Window Placement and Size: Windows provide natural light and ventilation; placement should consider privacy and sunlight exposure.
  • Loft Access: Decide on the type of loft access (e.g., fixed staircase, pull-down ladder) considering safety and ease of use.
  • Internal Partitions: Consider the need for internal partitions to create separate storage areas within the shed.
  • Ceiling Height: Ensure sufficient headroom on both the ground floor and the loft to facilitate comfortable movement and storage.

Detailed sketches or digital models are highly recommended to visualize the design and refine the layout before starting construction.

Material Selection

Choosing appropriate materials is vital for the longevity and structural integrity of your shed. Consider the following:

  • Framing Lumber: Pressure-treated lumber is essential for the foundation and framing to resist rot and insect infestation.
  • Sheathing: Oriented strand board (OSB) or plywood are common choices for sheathing the walls and roof.
  • Roofing Material: Asphalt shingles are a cost-effective and readily available option. Consider metal roofing for increased durability and longevity.
  • Siding: Vinyl, wood, or metal siding are viable options, each offering distinct aesthetic and maintenance characteristics.
  • Flooring: Concrete, plywood, or composite decking are suitable for the shed floor, depending on the intended use.

Obtain accurate material estimates based on your chosen design and dimensions to avoid delays and cost overruns during construction.

Phase 2: Construction

The construction phase requires careful execution of each step, adhering to established building practices and safety regulations.

Foundation Construction

A robust foundation is crucial for the stability and longevity of the shed. Common foundation types include:

  • Concrete Slab: Provides a durable and level base.
  • Gravel Base with Pressure-Treated Skids: A cost-effective option suitable for well-drained soil.
  • Pier and Beam Foundation: Ideal for uneven terrain.

The chosen foundation type should align with the site conditions and local building codes.

Framing and Sheathing

The framing process involves constructing the walls and roof using pressure-treated lumber. Precise measurements and proper bracing are critical to ensure structural stability. Once the framing is complete, the sheathing is applied to provide a surface for the exterior cladding.

Roofing and Siding Installation

The roofing material is installed according to the manufacturer's instructions. Proper flashing and sealing are essential to prevent water damage. The siding is then applied, providing both aesthetic appeal and weather protection.

Loft Construction

The loft construction involves framing the loft floor and adding support beams to ensure adequate weight capacity. The loft floor can be covered with plywood or other suitable material. Consider adding a railing or other safety features to prevent falls.

Finishing Touches

The finishing touches involve installing doors, windows, and any interior features. Interior walls can be finished with drywall or other suitable material. Proper ventilation is crucial to prevent moisture buildup and maintain a healthy environment inside the shed.

Phase 3: Permits and Inspections

Before commencing construction, obtain all necessary building permits from your local authorities. Schedule inspections at various stages of construction to ensure compliance with building codes and regulations.

Note: This guide provides a general overview. Consult with experienced builders or professionals for specific advice tailored to your circumstances and local regulations. Always prioritize safety throughout the entire construction process.

Building a 12x20 shed with a loft is a rewarding project that significantly enhances property value and provides ample storage space. By carefully planning, selecting appropriate materials, and following sound construction practices, you can create a durable and functional structure that serves your needs for years to come.

Share:

DIY Pole Barn Plans for Large and Small Projects

DIY Pole Barn Plans for Large and Small Projects


Hey there, DIY enthusiasts! Ever dreamt of building a spacious workshop, a cozy barn for your furry friends, or a stunning new garage? Building a pole barn might just be the ticket! It's a surprisingly accessible project, even for beginners, offering a sturdy, versatile structure that can fit just about any need.

Let's break down this exciting adventure, from small-scale backyard projects to larger, more ambitious undertakings. Buckle up, we're about to delve into the world of DIY pole barns!

Why Choose a Pole Barn?

First things first: why are pole barns so popular? Well, they're like the Swiss Army Knife of structures, offering a ton of benefits:

Cost-Effective: Pole barns are known for being budget-friendly. You're essentially building a sturdy skeleton with strong posts and using a simpler roofing system, which translates to lower material costs compared to traditional construction.
Versatility: From workshops and garages to animal shelters and storage sheds, pole barns can adapt to many different uses. Think of it as a blank canvas ready for your vision!
Speed and Efficiency: The construction process is usually quicker than traditional building methods, allowing you to get your project up and running sooner.
Easy Maintenance: Pole barns are designed to withstand the elements and require minimal upkeep, saving you time and effort in the long run.

Sizing Up Your Project: Small or Large?

Now, let's get into the nitty-gritty! You'll want to consider the scale of your pole barn project. Whether you're tackling a modest backyard shed or a sprawling multi-purpose structure, the fundamental principles remain the same.

Small-Scale Pole Barn Projects (Under 1000 Square Feet):

These are perfect for those wanting a manageable, DIY-friendly project. Think:

Garden Sheds: Keep your tools organized and your gardening supplies safe and dry.
Small Workshops: Ideal for crafting, woodworking, or small-scale projects.
Animal Shelters: Provide a cozy space for chickens, goats, or other furry companions.

Larger-Scale Pole Barn Projects (Over 1000 Square Feet):

For those with grander visions, larger pole barns offer incredible possibilities:

Garages: Park your vehicles, store your gear, and create a dedicated workspace.
Storage Buildings: Organize your belongings, tools, and equipment in a spacious, well-ventilated environment.
Multi-Purpose Structures: Combine your dream workshop with a cozy living area for a unique getaway.

Planning Your Pole Barn: Laying the Foundation for Success

Before you dive headfirst into construction, it's crucial to have a solid plan. This involves several essential steps:

1. Determine the Size and Layout: Consider your needs and available space. Sketch out a rough design and think about how you'll use the interior.
2. Draw Up Plans: Even if you're a DIY wiz, having proper plans is a must. They provide clear instructions for post placement, framing, and roofing. You can find free online resources, or consider hiring a professional draftsman for more complex projects.
3. Check Local Building Codes: Each area has specific regulations regarding pole barn construction. Be sure to familiarize yourself with these requirements before you begin.
4. Choose Your Materials: Select high-quality materials for your posts, beams, and roofing. Factor in the climate and intended use when making your choices.

Essential Tools for Pole Barn Construction

You'll need a few key tools for a successful pole barn build:

Post Hole Digger: Essential for digging holes for your posts. Consider a manual or powered version depending on your budget and the soil conditions.
Level: Maintaining a level foundation is crucial for stability. Invest in a high-quality level for accurate measurements.
Circular Saw: Used for cutting lumber and creating precise cuts for framing.
Measuring Tape: Accurate measurements are vital for precise construction.
Hammer: For driving nails and securing the framing.
Safety Gear: Safety goggles, gloves, and sturdy work boots are essential for protecting yourself on the job site.

The Building Process: Step by Step

Now, let's talk about the construction process itself:

1. Preparing the Site: Clear the area where your pole barn will be built. Remove trees, rocks, and debris to create a level foundation.
2. Setting the Posts: Dig holes for your posts according to your plans. Make sure they are deep enough to accommodate frost lines and are level. Concrete is often used to secure the posts in place.
3. Erecting the Framing: After the concrete has cured, connect the posts with beams to create the structural frame of your pole barn. Use high-quality lumber and secure the connections with bolts or lag screws.
4. Roofing: Install rafters and purlins to support the roofing. Choose roofing materials suitable for your climate and intended use.
5. Wall Cladding: Add exterior siding to protect the structure and enhance its appearance. Consider options like metal siding, wood panels, or even vinyl siding.
6. Interior Finishes: If you're planning on using your pole barn as a workshop or living space, you can add insulation, drywall, and flooring.

Let's Talk Cost:

The cost of building a pole barn varies significantly depending on the size, materials, and location. However, here's a general breakdown to give you an idea:

Small-Scale Projects: You could expect to spend anywhere from $5,000 to $15,000 for a basic shed or workshop.
Large-Scale Projects: A more substantial pole barn could cost $20,000 or more.

Additional Tips for Success:

Seek Professional Advice: Don't hesitate to consult with a local contractor or engineer for guidance on structural aspects of your project.
Start Small: If you're a beginner, begin with a smaller-scale project to gain experience before tackling something larger.
Get Help: Enlist the help of friends or family to speed up the construction process.
Stay Organized: Keep your tools, materials, and plans organized to streamline your workflow.

Building Your Dream Pole Barn: A Journey of Satisfaction

Building a pole barn is a rewarding and satisfying project. You'll gain valuable skills, create a space that fits your needs perfectly, and have a sense of pride in your accomplishments. Remember to approach the project with careful planning, prioritize safety, and embrace the journey of building something beautiful and functional!

Share: